Some sentences have formatting markers used to apply different styles or links to the text.
In WebTA, a text included in a formatting marker appears highlighted, and each marker has its own color to help you distinguish them.
It is very important to apply the formatting markers to the translation in the same way they appear in the original text. This ensures that the translated page looks and functions exactly as the original one.
How to apply formatting markers
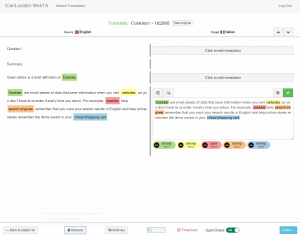
In the image below, you can see a segment containing formatting markers.
You can see in the Source column on the left that the text is highlighted, and there are markers inside other markers (nested formatting markers).
Below the translation field, you can find the colored buttons corresponding to the formatting markers in the source segment.
To apply the required formatting markers to the translation, follow these steps:
- Select the text to mark in the translation field
- Click on the desired formatting marker button to apply the formatting to the translated text. It’s also possible to use keyboard shortcuts, pressing Alt+[Marker Number].
Important: The formatting markers colored bars have margins on their sides that might look like spaces. Please note that those are not typed spaces but just a visual margin. To insert a space before and after marked sections, please type a space. You can check if the spaces are correct in the preview before completing the job.
Nested formatting markers
If there are multiple markers on the same words, the markers should be applied from the innermost to the outermost.
In this case, <yellow><red><orange>words</
Things to watch out for:
- You can check how the original page looks clicking the “View original” button at the top of the page
- Make sure the formatting markers span complete words
- If a sentence includes several markers, verify that markers and text match. You can use the mouse to hover over the highlighted source text or the markers buttons to show tooltips with the names of the markers


